Saturday, August 29, 2015

I Dub Thee...Spunky's Flyer!

The gear returns to the shop for...


Body on...


Seat on...


Dashboard on...


Welcome to the21st century, Baby!

Wednesday, August 26, 2015

Inching Toward "The Finish"

It gives me such great pleasure to have discovered that I am not the hopelessly unteachable senior citizen that I thought I was becoming!

All throughout my last restoration project I was plagued with every paint problem one could imagine.

Last year, I had repeated problems trying to paint the seat of this carriage.  On the first try this year, the same thing.

The main defect in the paint was "orange peel" a condition that makes the paint look like the peel of an orange when it's dry.

Since all the references I read indicated that orange peel was a defect of application, I tried everything I could to stop the problem from occurring, but it plagued me right down through the painting process.  I continuously blamed myself for being untalented and unable to learn from repeated failures.

Until I mixed paints of two different types to obtain the pale yellow for the gear.

The paint I've been using all along is a straight "alkyd enamel".  There's no point in trying to explain what "alkyd" means, except that it was one of the first types of synthetic materials developed for paint in the early 20th century.

Hey, it was labeled "buggy paint".  What do I know?  Except that I couldn't master either brush painting or spray painting the stuff.

When I mixed the paint for the gear, I used one quart of the straight alkyd, to two quarts of "urethane fortified" alkyd paint.

Everything changed.  I painted the entire gear, wheels and shafts with the mixed paint and not one time did I spray on a defective coat.

Finally I started a search for information on urethane.  I know that urethane clear "varnishes" have a bad rap amongst natural wood vehicle owners because of adhesion problems, but as it turns out, this is an issue related to the very way the paint flows out.  It's slippery, and requires some special steps to prepare the surface to receive finish coats.

I discovered in working on the gear and wheels that the paint flowed on to metal surfaces like glass, where the wood wheels benefited from a drying period, followed by an additional wet sanding with 600 grit, which then produced the honey-smooth flow-out of the paint.

It seemed that all my reference materials were overlooking one key point to successful spray painting:  Perhaps if you fail repeatedly to obtain the finish you want, it's your material, not so much your technique.

Of course a skilled painter might not have these problems, but I am sure skilled painters work with the materials that work the best for them - they don't waste time blaming themselves that one particular product just refuses to cooperate.

So it is with a beginning painter...I'm looking at a product that after all this trial and miserable error, I've found a paint that I can work with!

In the photo above, the carriage body has received its first coat of urethane fortified black paint, and the black has revealed all the preparation work that I didn't do adequately!  :o)  At first I thought my problems had returned, but when the paint dried, I realized that the supposed defects were in the surface, not the paint!  This afternoon, the body will receive a meticulous wet sanding with 600 grit sand paper and go back in the booth for what I hope will be its final coats of paint.

At any rate, every part of the thing is now protected.

As I write, the carriage seat is drying in the paint booth, and as the paint shrinks down onto the surface - which has been sanded innumerable times with 600 grit - it's beginning to look like obsidian!

Now!  What paint is this, you may ask!  This is Davis Paint, specifically their 1700 Series Classic Collection Industrial Paint.  The paint is formulated for multiple substrates, including wood and metal.
The paint is primarily found in the eastern part of the US, however it is sold by the Schwartz Mfg. LLC company, an Amish company in Berne, Indiana.  They only stock limited colors, but it appears that the paint can be mixed to order using the color chart on the website.

On another happy note, I installed the floorboards today.  Those rods are "stilts" for painting, and no, the front is not red, that's just a reflection.

My next post, if I can contain myself that long, should be of a fully assembled carriage!

Off to sand.

Friday, August 21, 2015

Milestone!

In an unprecedented application of will power, I got the two front wheels sanded and painted this week!

The pictures look pretty nice if you click on them to enlarge.


The sanding of the primer on the two wheels took about 5-6 hours for each wheel, and sanding between coats of paint took about 2 hours for each wheel.


I learned a great deal about paint while doing the gear.  Only time will tell how the job holds up, but the application of the paint was nothing short of an epiphany.  I'll blog that in the future.


The next piece to go into the paint booth will be the body, then the seat.  If all goes well, I should have those parts done next week.

This will give the gear paint awhile to cure.  I need to mask the hubs so I can paint the inner and outer parts of the hubs, step treads, etc. black.  Don't want to stick masking tape on the fresh paint!

Once I get the body and seat done, I have contacted a striping artist who is willing to stripe the vehicle for me.  I managed to destroy the finish on one of the body bolsters in a do-it-yourself episode.  Not keen to try again!

The wheels have a nice fresh coat of grease and new leather washers, and I find that the whole thing fits handily in the carriage shed without taking the shafts off!  :o)  Big plus - the little devils are tight!

Shaft cover materials are on order.  I think my goal of getting the entire carriage painted before the end of summer will be met!

The last dirty metal, the foot rest, has been cleaned and primed.  I have a little work to do on one of the dashboard mounts.  Soon, I'll be able to go back to my "other" life for awhile, awaiting the rains of winter for the indoor job of upholstering!

Tuesday, August 11, 2015

Crack Re-Repair and Paint Performance

A week or so ago, I reported that I had discovered repair failures in the seat riser cracks.

I also indicated that I had a couple of different choices in dealing with the failed repairs - either "veneer" the entire panel, or just suffer the presence of the cracks.  I was dangerously close to accepting the latter choice.

These are about the only choices offered by the last known (to me) carriage restoration book, published in the 1990s.

Fortunately I have a couple of friends that won't let me settle for second best.

Walt and Kathy Ashford, dedicated carriage enthusiasts, called to discuss the method that Walt prefers in dealing with panel cracks.

First off, I'll talk about the mistake I made in repairing the cracks.  I did everything right, but I selected the wrong material for the repair.  I was in the midst of a honeymoon with a newly discovered product, a marine epoxy fairing compound.  Sort of like a sea-going Bondo, as it turns out.  I really can't explain this choice except for the fact that the cracks seemed so shallow after glue seeped up into the voids, that I thought I could get away with a cosmetic, as opposed to a structural repair.

The fairing compound is for filling voids.  It is NOT, as it turns out, designed for holding together two edges of wood that are likely to move with changes in temperature and humidity.

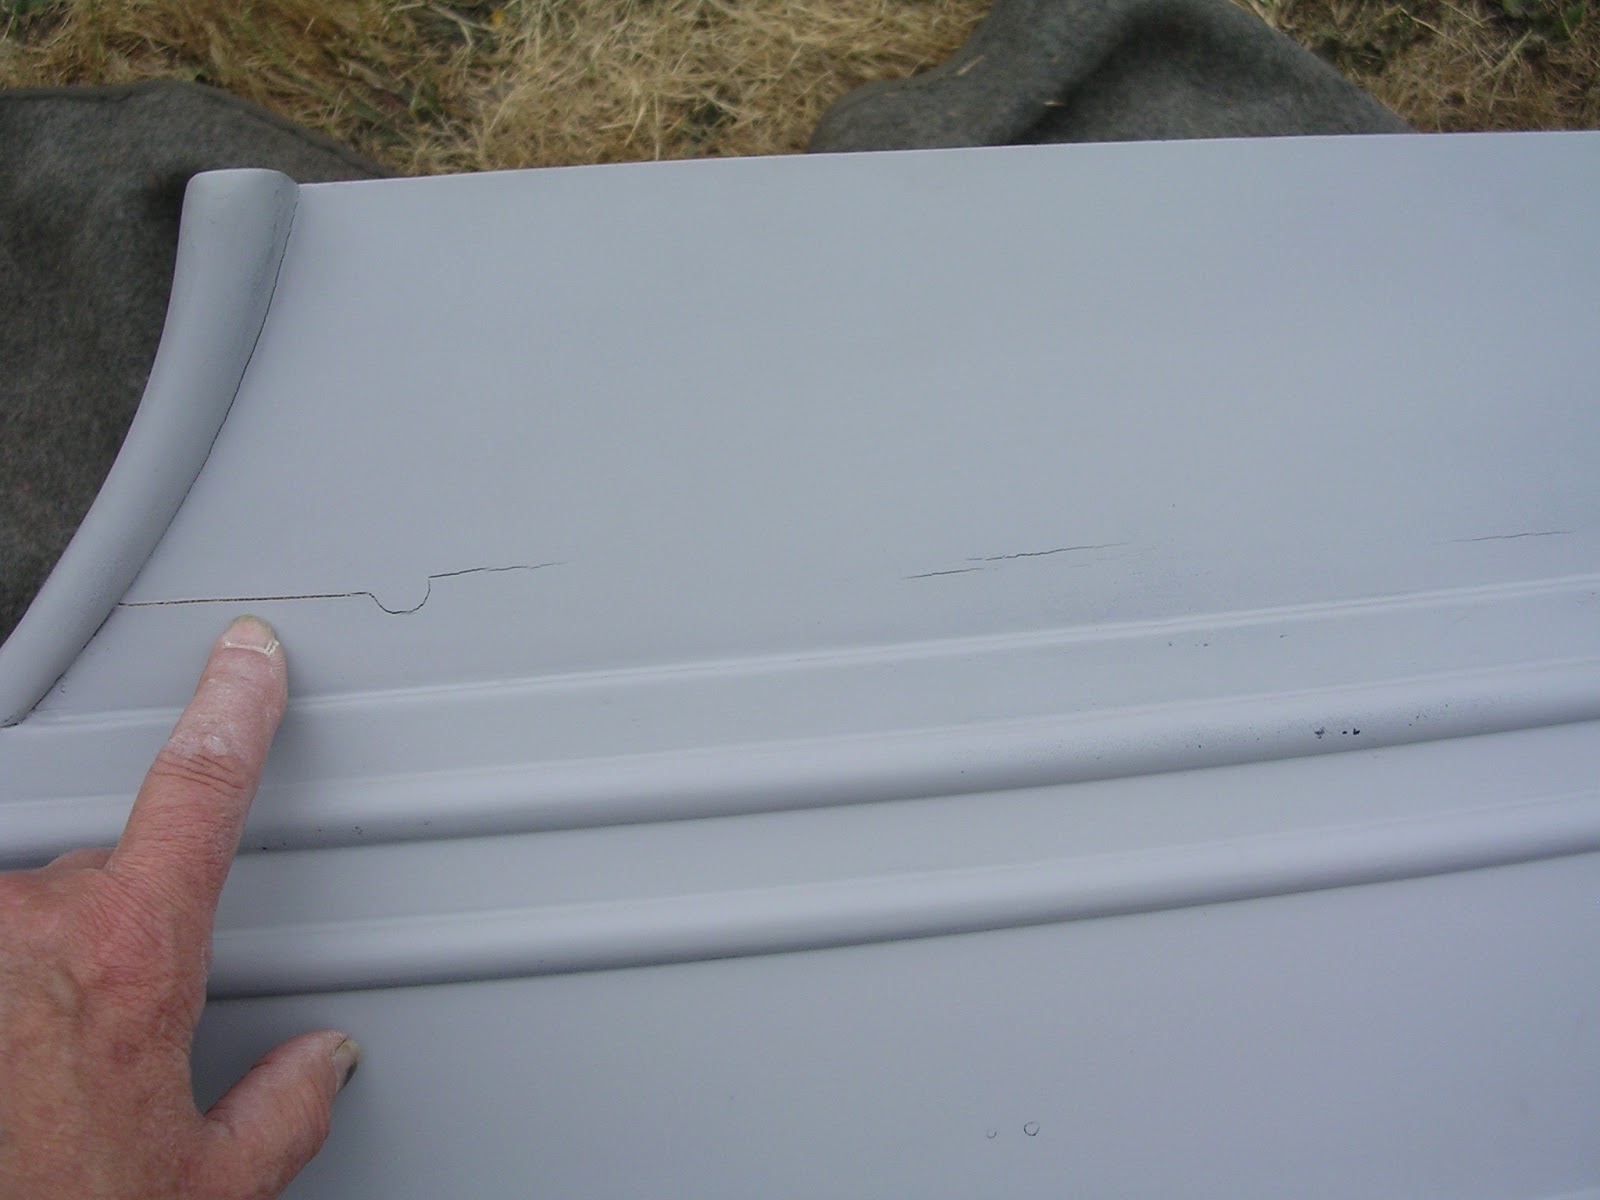
I had backed the cracks with strong glue and strips of oak, which probably helped to keep things from getting worse than they did.  However, there were places where I could not support the cracks from behind, notably, around the seat pillars.  The evidence suggests that this is where the movement really began.  In the photo above, I'm pointing to another area of a crack which I was unable to back with a piece of oak...the crack was directly below the seat frame.

One of the problems with backing a split with a glued reinforcement is that you can't do it in places where the backing piece will show, such as on a sleigh dash, or an open cart, where both sides of the wood are visible.

Walt and Kathy called to discuss their technique for repairing panel cracks, and as it turns out, I should have been smart enough to figure it out for myself.  I just simply didn't think the wood would move again after gluing the backing pieces on.

Walt's preference for repair material is WEST System Epoxy Resin.  Please note that I am not sure if this is the EXACT product that Walt uses (hoping he'll correct me if not) but it is the brand he mentioned.  The structural epoxies that I have used with great success  come from Abatron.

These products are NOT your grandfather's polyester fiberglass resin!  They are formulated to creep...and creep...and creep...into wood fibers, rotten wood and voids and they form a phenomenally strong bond.

Walt first asked me if I had used wood sealer before priming.  The answer was "yes," but only one coat.  That is what the label calls for.  Experience trumps labels though, and Walt advised that I'd have been better off to apply three or so coats.  Particularly since the body spent so much time in storage, and had to endure some serious changes in temperature and humidity.  Primers are porous and offer very little protection to old, fragile wood panels.   Unfortunately, favorable weather for properly curing repair materials and painting, lasts only a very brief time in our region, and not everything can get done in a timely fashion when one is working in a metal shed.

(As an important note, NONE of the Abatron repairs to the seat or body have failed in a year's time, either painted or not.)

Walt "dams up" any potential places that the resin can leak out of the repair zone.  His preference is for automotive masking tape.  All I had on hand was painter's masking tape.  He ensures that the repair is made on a warm, dry (not humid) day, and even takes the precaution of warming the wood and resin, to maximize saturation. (I discovered that warming the resin too much shortens its pot life drastically - had to start over!) I worked in the sun on an 85 degree day, allowing the materials to warm for an hour or so before I began.

I masked off the areas adjacent to the repairs, because I know this stuff gets all over EVERYTHING.  It is SO slippery.  I used a 3ml livestock syringe to drip resin into the cracks but I couldn't keep a needle on the end of the syringe.  It kept sliding off.

Now the fun begins.  You need to be able to babysit the project ALL DAY.  If there is the tiniest bit of fluidity to the resin, it will continue to creep into voids.  And it will find voids to creep into ALL DAY.

Walt advised me to use a .004" feeler gauge to work air pockets out of the crack.  That was a really great idea as several bubbles worked up to the surface.

I kept dribbling in resin until it domed up over the crack and stayed that way.  In the morning, it appeared that over night, a little more resin had crept into the voids.

Once the resin cured completely, I sanded the excess away, down to the original repair.  Now, here's my big concern.  The cracks are still contaminated with the previous repair materials.

Had I tried to pry out the fairing compound I would have had a mess of epic proportions on my hand.  A hairline crack in the paint, should it reopen, is just not worth that much to me.  But if the crack fails again, it won't be the Abatron that fails, it will be the fairing compound. Presently, there are NO VOIDS in the area of the repair.  And the repairs will be covered with enamel before another major weather change occurs.  If it happens to hit 100 degrees and 12% humidity again before the final painting, the body will come into the house!


To finish up, I smeared some automotive spot putty over the repair to fill pinholes, etc., then sanded it all smooth again.


Reprimed and drying, awaiting a light sanding before going into the paint booth.

BUT WAIT, there's more...


PAINT PERFORMANCE  

 After one more Karate Kid style procedure - spray on, wipe off - I got a nice coat of black paint on the long-suffering seat.

Except...

The demon Orange Peel reared its ugly head to plague me again.

All throughout my last project, I battled orange peel, usually losing.  I did everything to optimize painting that I could think of, and doggone it!  I haven't had ONE SPECK of orange peel in the yellow paint!  What could be different?

Well...

I mixed the yellow paint myself.  The yellow paint was alkyd enamel.  The two cans of white paint were urethane enamel.

My last project was all alkyd enamel.  The black paint on the seat is straight alkyd enamel.

Umm....connection here? 

I don't know.  I have some research to do.  Tomorrow I'm putting in an order for the urethane enamel in black. While I'm waiting for it, the running gear will go into the paint booth, and I still have two wheels to sand and paint.  The carriage body can rest for awhile longer and it will be the "guinea pig" for the urethane paint.

My sincerest thanks to Walt and Kathy for keeping me propped up on this project when the going gets rough, and for sharing their tips on successful repair techniques!

Sunday, August 9, 2015

Spray Painting Notes of Interest (Well, I Think So, Anyway!)

I now have a fair bit of experience with this little Badger 400 detail gun and I have some thoughts to share.

In preparation for painting the body, and RE-painting the seat in black, I brought the floorboards into the paint booth to practice shooting black paint.  The boards haven't had any particular surface preparation, other than being sanded and primed.  They will be covered with a mat.

I recently spent $40 (ack!) for a 1.3mm tip and fluid needle set for my "best" HVLP gun.  This is the smallest set I can get for the gun.  I wanted to try the big gun first.  The boards were turned upside down and I sprayed away.

Right away I noted the orange peel that had plagued me through my last project.  In addition, even though the air runs through a (cheap) filter, I got specks of contamination in the paint.  I did not have one of those round black disposable filters on the gun (as shown above).  Fine for the bottoms of the floorboards, but not what I want for the seat and body!

I've been having quite good - but not consistent enough - results with the little Badger gun.  What I did different today, however, was to put a PSI gauge on the gun.  (I need to reverse the filter and gauge).  I was SHOCKED to discover I had a MASSIVE pressure drop between the compressor and the gun!  The gun wants to work at 30 psi.  The gauge showed that there was a full 10 pound pressure drop between the compressor and gun!  I ended up bumping the pressure at the tank to 50 psi, and regulating it down to 30 at the gun.  The results were ABSOLUTELY impressive!  The gun laid down a beautiful, finely atomized and easily controlled film of paint on the tops of the floorboards.

By all means, if you are going to spray paint your carriage, PUT A PSI GAUGE ON THE GUN!

Here is a comparison between the fluid needles of the respective guns.  The upper needle is the 1.3mm needle from my big gun.  It is the smallest option available for that gun, apparently.

The bottom needle is from the little Badger detail gun.  It is the "medium" needle of the fine, medium and coarse tips that were offered for the gun (which is no longer made - DeVilbiss offers an exact copy). I know that successful spray painting is the sum of a thousand tweaks, but I'm pretty sure that the fineness of the needle and tip on the detail gun are largely responsible for the fine atomization and resulting nice paint job that I haven't been able to obtain with the HVLP guns.

Obviously the tiny gun is not suitable for big jobs, but for everything on this little buggy, it seems like the perfect choice.  And now, I am hoping that I have worked out the final detail of getting a great finish on the seat and body!

As a final note, remember that I am spraying old fashioned enamels.  Results may be entirely different with modern catalyzed paints and clear coats!!  This is what is working for me!

Sunday, August 2, 2015

Well, This Throws a Spanner in the Works...

 Proving the old adage that a repaired panel crack will almost certainly open up again...
...I discovered that the repaired seat riser panels had indeed split open while the body's been in storage.

Just another day in the life of a restorer.

So, I have two options.

One is to ignore the cracks and suffer their existence.

The other option is to veneer the panels.  The panels cannot be replaced.  The body and seat riser are one unit.

Veneer options include wood veneer (bending plywood), fiberglass and Formica.  I am leaning toward fiberglass.

Opinions welcome.  In the meantime there's no crying over spilt milk.  All my antiques have developed or re-opened cracks in panels and there are lots of places I should have skinned the damaged panels.

There is always something to learn.  Anyway, I had set out to remove the floorboards for painting and that is done.  I'll keep working on other parts until I decide what to do here.