Well, here she is. For better or worse, the restoration of "Spunky's Flyer" is finished.
There is no pinstriping, and no lamps.
Regarding the lamps, there is just something about the lines of the carriage which made lamps look simply like clutter. It never had lamps, and although I have a pair, I opted to leave them off.
Pinstriping: As long as there is none on it, it can be added later. However I had a REALLY BAD experience trying to do it myself with a Beugler striping tool. I tried to pull a line along one of the bolsters before I reassembled the carriage.
I made a mistake on the first try and attempted to wipe the black paint off the yellow bolster. Somehow or other, the black paint smeared and became an indelible part of the yellow paint. I had to sand the bolster down and repaint it. Although I have a professional striper willing to do the job for me, I just have no desire whatever to hand it over to someone else as you will soon see why. In today's market, the value of the buggy has already been exceeded by the cost of materials, not to mention personal labor, and since it's not for sale anyway, I've decided to postpone striping indefinitely.
That leaves upholstery as the final step to finishing the restoration.
First of all, I do NOT know how to upholster. That means that whatever you read here is not a how-to guide, but rather a record of how I did it. If you pick up enough tips to do your own upholstery, that's great.
I don't know how to paint either. That sort of thing doesn't usually stop me from trying anyway.
Whatever I do know about applying fabric and foam to a carriage seat and getting a pleasant result, I learned from the old A & D Buggy Shop video.
Sadly, it appears that all my copies of the video have deteriorated to the point of being nearly useless.
But I kept prodigious notes and photos on my two previous "button jobs", including the absolute heartbreak of doing this green thing not once, but THREE times.
The first carriage I ever rebuilt was a completely unrecognizable pile of rusty metal and rotten wood. But for some reason, I felt I couldn't upholster it, even after doing all the work of resurrecting it. So I sent it to an upholstery shop, and got this back.
What you don't see, is that the man didn't know how carriages were upholstered. Without my permission, he
drilled holes in the seat backs, and pulled his tufting twine through, then tacked the twine to the OUTSIDE of the seat backs. He then nailed a strip of crappy lath across the holes and painted it. He then charged me $400, which in 1979, was a month's wages for me. This experience, along with others, made me deeply suspicious of sending any work out to "professionals" and fueled my Do-It-Yourself spirit.
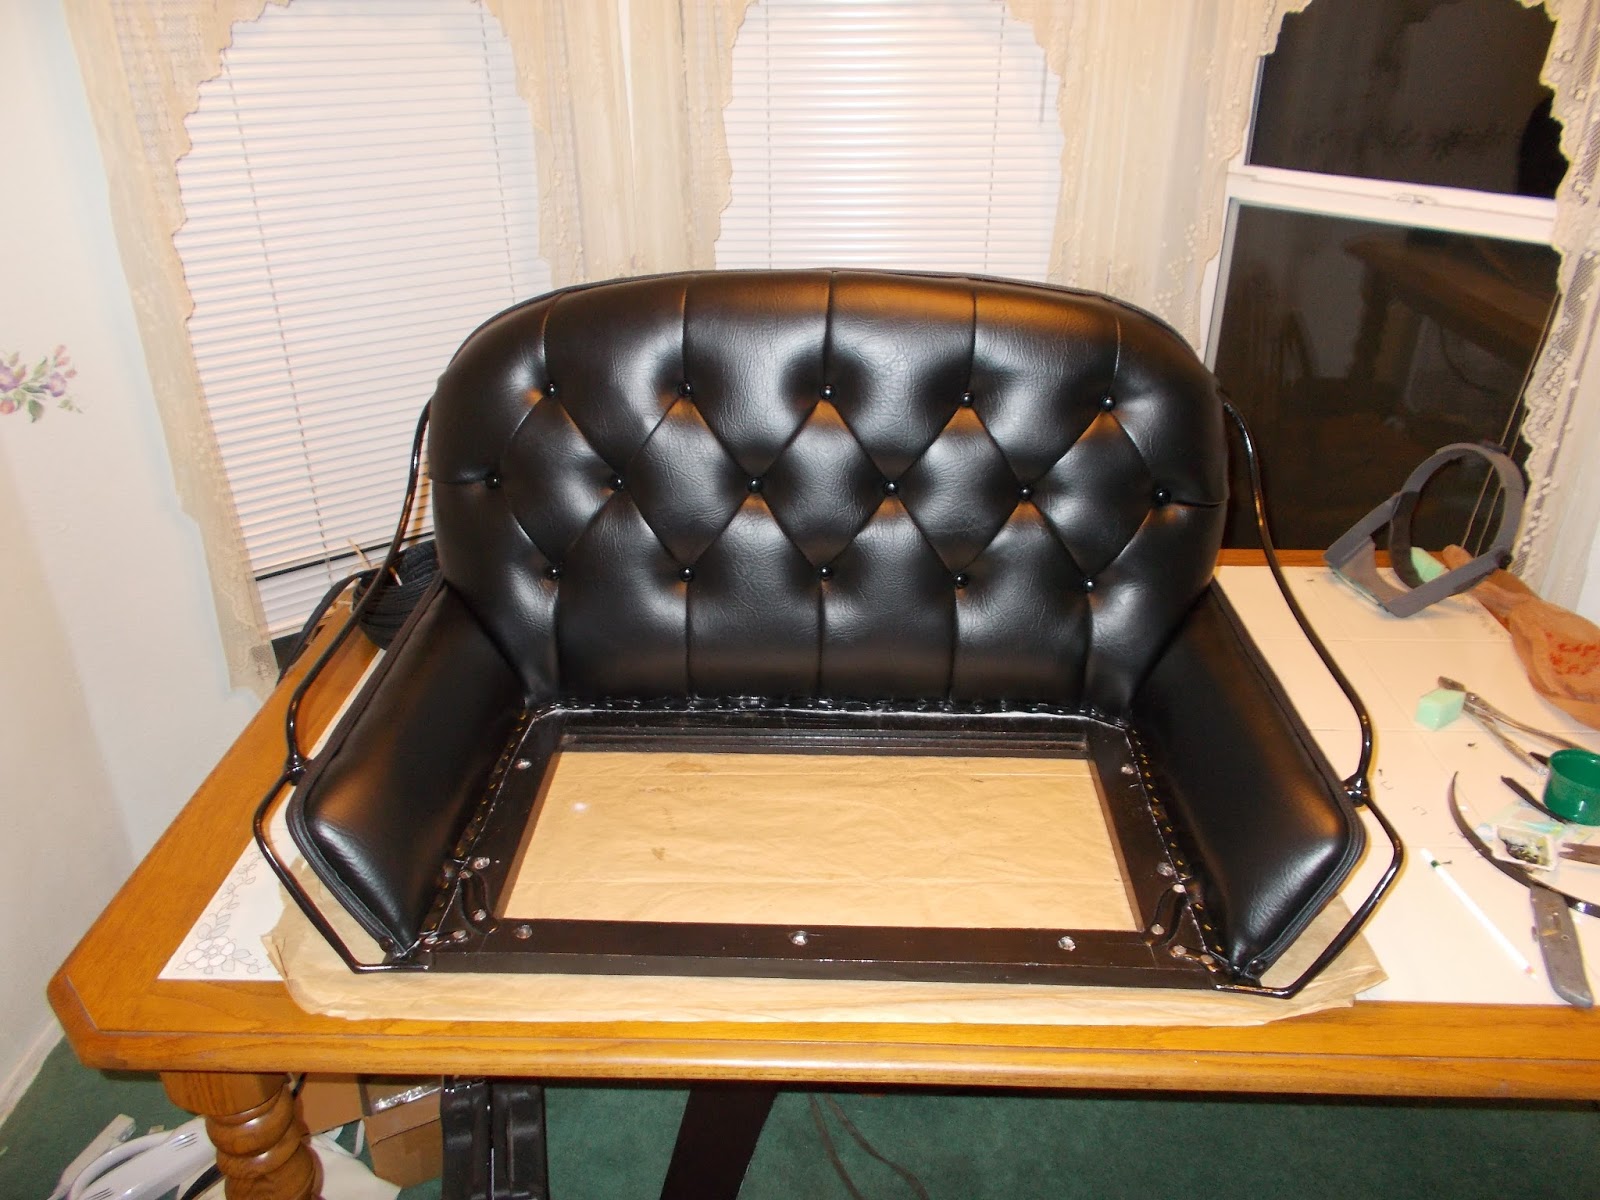
Carriage upholstery is first made up in separate pads, called "squabs" and tacked into place.
The seat back - or "lazy back" cushion on this buggy is built on a foundation of canvas with some card-type stiffening at the bottom. The buttons have loops through which a stiff wire passes to hold them in place. This is how the tufting is done without anything showing on the outside of the seat. A single row of springs, stapled to the wooden seat back near the top provided a bit of extra comfort.
The upholstery job I am doing bears no resemblance to the original method.
I have watched what was still view-able of the old video and realized how much of it was seat-of-the-pants. So, that's me. The current project is so uncomplicated, compared to the first two projects that I attempted, I reassured myself I could do it. But the pain of the last job is still so fresh in my mind (what four? five? years ago!) that I have delayed starting. If you hope to learn to upholster by reading this, bear in mind...it's all seat-of-the-pants.
Well, I started. And I am going to tell you, step by step, how I am doing it, in hopes that the old A & D video will live on and help other DIYers.
The old cushion was a very simple pattern with large diamonds. It was stuffed with black horse (I'm assuming) hair, which was considered a superior stuffing. The stuffing in the Viktoriatrilla cushions was some sort of dry grass, and the little bit left on the Jinker looked like clothes dryer lint. Probably some sort of felt. The cover is leather and is very much perished. The buttons were painted, not covered. There are sixteen buttons in the back cushion.
The restoration of the wee buggy was finished in the fall of this year (2015) and I spent many delightful hours driving it with annoying, loose padding before parking it for the winter.
The experience of actually driving it brought me to the decision to upholster it with vinyl, which I know will disappoint a lot of people who have been following the blog. Well, I've made a number of decisions with a view to practicality during the restoration, and a working carriage doesn't need a stain-able, fade-able cloth cover. And leather is just not happening for this amateur. I had to re-do that green cushion three times before I got it right and at $83 per yard for the green wool broadcloth material, six yards total, my mistakes were extremely expensive. Simple and durable won the decision.
Being painfully wary of failure, the first thing I did was draw a fairly accurate diagram of the seat back. I ran off several copies To use during separate procedures.
One of my objectives is to match the tufting pattern as closely as possible, so the first thing I did was diagram the original pattern The diamonds are 5 1/2" wide and 7 1/2" tall. Those are big diamonds!
If you do not have the original upholstery to work from, you will have to invent your own pattern. Take a look at the edges of the drawing (which is not entirely accurate), and you will notice a pleasing border of "channels", straight lines fanning out to the edges around the perimeter of the diamonds. My notes say that the buttons should end somewhere around 2" from the outside edges. When you're planning your job, it's nice to come out with such a border. The lower tier of buttons on this job starts at 7" from the bottom, which coincides with the "joint" between the lower and upper seat back panels. When you are planning your job, consider where the top of your bottom cushion will be - if it is 4" thick, you'll probably want your lower tier of buttons to be at least 5" from the bottom, otherwise they will be covered up by the cushion.
My regular camera died in the middle of this project, so I ended up taking a few pictures with my cheap cell phone.
At any rate, once I had my button pattern mapped out, it was time to commit.
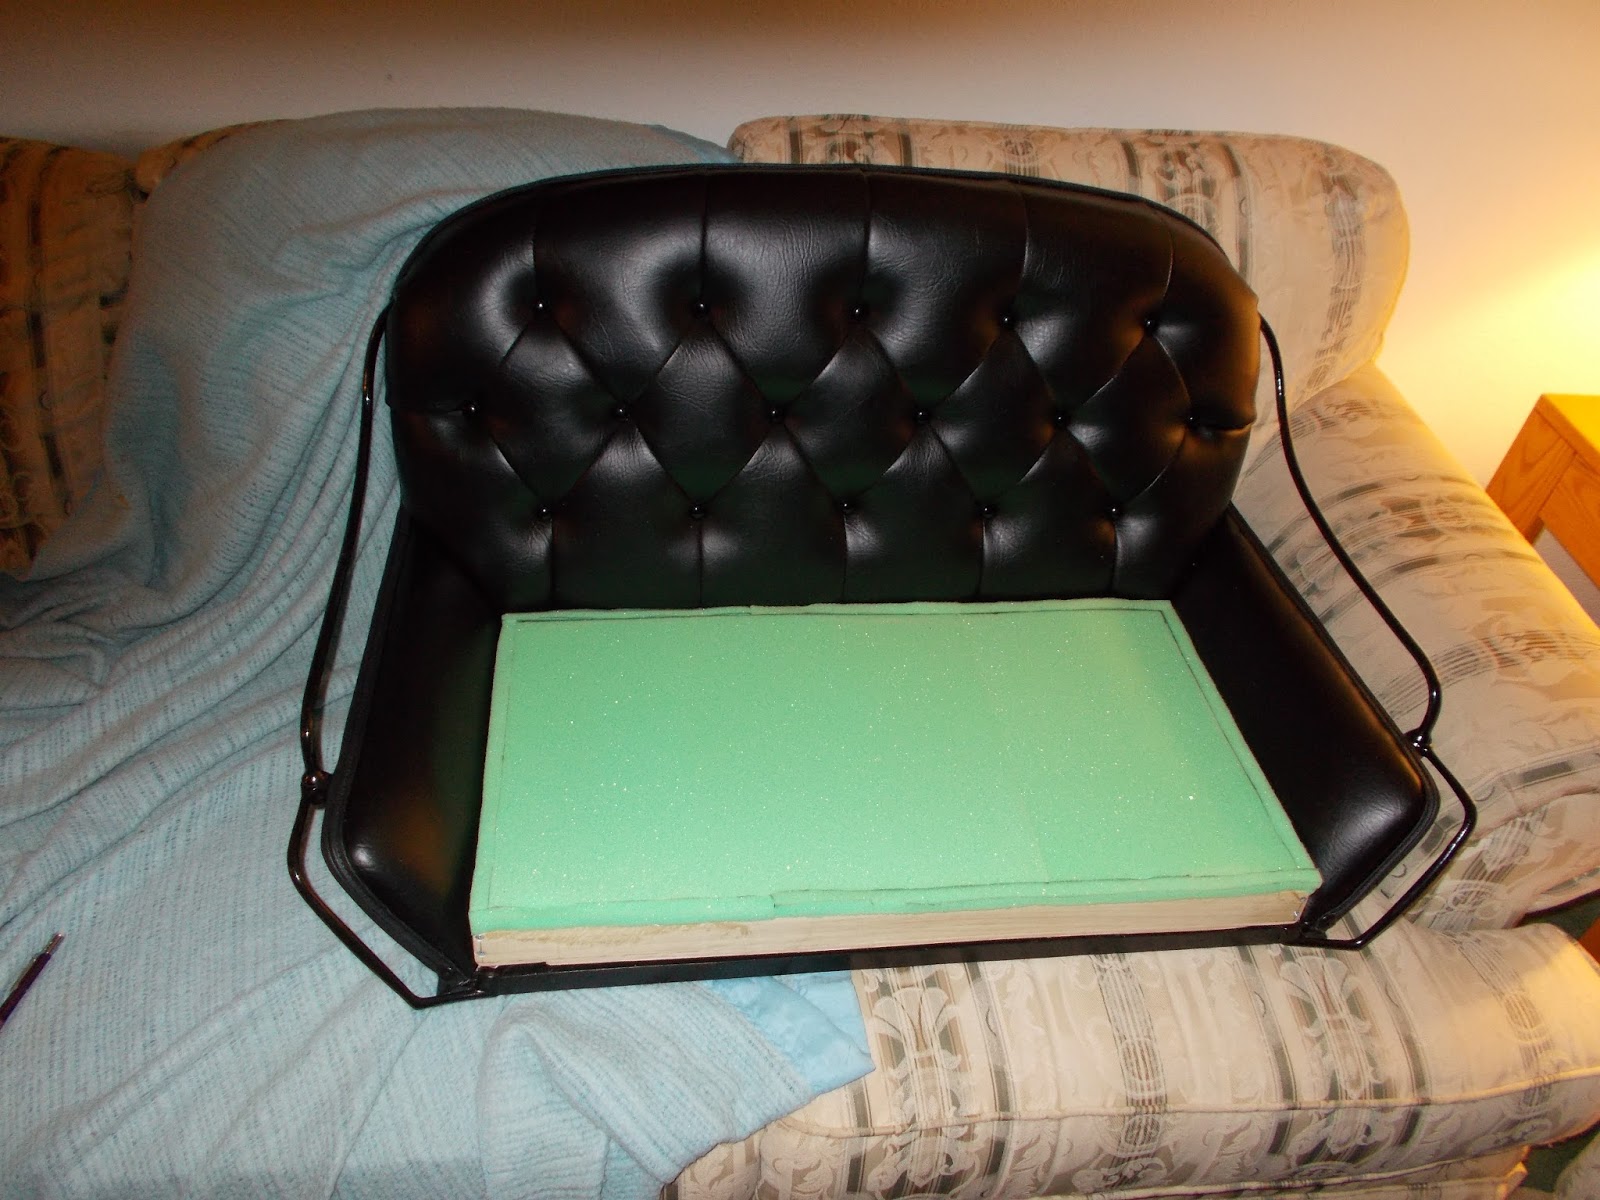
Since I'm not using any springs, the first step was to glue a piece of 1" foundation foam to the back of the seat. The foam is "extra firm". The cutouts are for wooden "ribs" that hold the upper and lower halves of the seat back together. The seat back and foam were sprayed with adhesive...the old video recommends 3M #74 spray adhesive. You can actually see the seat back through the foam...the foam was subsequently trimmed to the outline of the seat back with an electric carving knife.
The next step was considerably trickier; cutting out the 2" foam for the squab cushion. Again, the foam is "extra firm".
There is probably some industry standard that tells how much the foam will "shrink" when sucking tufting buttons down, but I don't know where to find it, and neither did the A&D video state a formula...he was obviously muttering guesstimates when he made the video. And some of his mutterings cost me big time on my last project.
You see, for every button you shove down into the foam, the dimension of the slab change a bit, getting ever smaller. So you need to allow for this shrinkage. How much? Mutter mutter...
For this job, I allowed 2" extra all around, except at the bottom. The 2" at the top has proved to be a pretty faithful estimate. For the rest of this project, which has relatively few buttons, I ended up with a little extra on the sides, which was easily trimmed before tacking the squab to the seat.
So, I have got a 1" foundation of foam glued to the seat back, and am preparing to make up a 2" pad, on the workbench, which will later be transferred to the seat and tacked in place.
Fit up - the cushion "pooches out" from the seat back because it is a bit oversized, which at this point is what we want. I learned to draw centerlines on EVERYTHING, front and back. The vertical line does not look centered, but that is a trick of the camera. The lower horizontal line is supposed to represent the joint between upper and lower halves of the seat back, which is also where the bottom row of buttons will be.
Centerlines on EVERYTHING, front and back at this stage.
I am going to begin working on the cover. It can't be overstated that everything needs to be STRAIGHT and SQUARE with buttoned upholstery, so the first thing I am going to do is make sure that the cut edge of the material is square with the selvage edge. Note: I bought four yards of vinyl for this project and that worked out just about right for this small seat. The yardage was just a guess.
It's nice to work on a surface that would allow you to temporarily tack the cover material down square in the corners. I don't have a surface like this, but vinyl doesn't stretch and move like fabric, so I muddled through. Allowing for "shrink" when the buttons are pulled down, I laid the foam on the vinyl and traced it, giving myself a good 8" extra all around, and cut my material from the roll.
The next task is to lay out the diamond design on the back of the cover.
The one thing I have found pretty consistently reliable is that when stitching the diamond pattern (yes, it is stitched, not hand-tufted), the pattern will "lose" 1/2" vertically and horizontally. The finished size of the original diamond pattern was 7 1/2" vertically and 5 1/2" horizontally. So when I drew the diamond pattern onto the cover, I drew them 6" wide and 8" tall. Likewise the "channels" are 6
" wide. All diamonds and channels were marked out starting from the center.
My old camera had died at this point, so I missed a few shots. Here I'm "faking" a few pics just to show the steps.
Once the pattern was marked out on the back of the vinyl, it is time to stitch them. To do so, I fold the material along one of the pattern lines (I always begin in the center and work outward) I put the needle exactly at the point of a diamond and began to stitch, backstitching at each point.
According to the video, diamonds are sewn first, half diamonds second, channels last.
As I stitch, I arc slightly away from the fold line, about 1/8" and as I reach the next point, arc gently back in, so the needle ends up at the exact point of the diamond. Backstitch.
So the individual seams begin to look something like this...
The back side of the cover will look something like this...
(This is the bottom cushion cover, as I did not get photos of the seat back cover)
And the outside will look something like this.
A lot of the upcoming photos are of the bottom seat cushion and not the back, because I didn't get photos of all the work on the back. It's all pretty much the same.
Before putting pad and cover together, a piece of cotton "drill" was glued to the back side of the foam. You don't have to use drill. Muslin or just about anything will do. Once again, center lines are drawn.
I actually ended up drawing the complete button layout on the drill, just to help me keep everything straight and parallel.
I marked the front side too, although this wasn't really necessary.
What I don't have to show you here (since I didn't buy the right stuff), was the A&D video calls for gluing a 1" thick piece of poly quilt batting on the top of the foam, to give extra loft to the tufts.
We are back to the bottom cushion for the next few photos.
Once the pad is prepared, the cover is laid on top of it and all the centerlines are carefully matched up
In the A&D video, the outline of the pad was traced onto the underside of the cover before flipping it over, and a both were sprayed with glue around the perimeter and stuck together.
Anyway, here we go. Time to install buttons. It is best to have two yard sticks for this operation, but one will do. Lay the stick along a row of button points - this will guide you in inserting the button prongs.
Button prongs? Yes! The buttons have "legs" that push through the cover and foam, a washer is installed on the back side, and the prongs are spread apart to hold them in place. These prong style buttons are available from Witmer Coach shop, either painted or covered, and they will cover buttons with your material if you desire. These buttons are painted, and I really like them. However, the prongs are painted together and had to be separated with a slim knife.
Here I have pushed the buttons through but I have not fastened them down. I used the yardstick to make sure they are exactly in line - a second yardstick can be positioned parallel to the first to assure the next row is exactly parallel to the first. An ice pick or similar can be used to make a small opening at each diamond point.
The entire assembly is then very carefully turned over. The foam is compressed enough for the button prongs to push through the fabric backing.
Now, starting in the middle, a washer is installed over the prongs. The foam around each set of prongs is forced ALL THE WAY DOWN AS FAR AS IT WILL GO, and the prongs are spread out. Work from the center outward.
The pad was turned over, and is basically ready to install on the seat back. Obviously I allowed myself plenty of excess around the edges.
Now it's a matter of fit up. Here is where you'll be glad for all those centerline markings! There was no way I could take picures. However this is what I found.
My allowance of 2" extra foam at the top was spot on. There was a wee bit of excess around the edge to cushion the wood when the cover was tacked down. There was a bit of excess foam around the sides, which was easily trimmed by folding the cover back and cutting with the electric knife.
However there's one big flaw with the A&D method...there is TOO MUCH FOAM where it meets the bottom of the seat - even though I allowed no extra at the bottom.
You see, the problem is that all that foam takes up valuable width for the bottom seat cushion. The original squab ended where the two seat back panels met - 7" above the bottom. I didn't have the patience to resolve this problem.
What I ended up doing was slicing 3" off the bottom of the foam. I relied on the foam self-shaping when I pulled the cover down tight. I got pretty lucky.
When everything is fitted and trimmed to you're liking, the foundation foam and the back side of the squab are sprayed with adhesive and stuck together. Good luck getting lined up on the first try.
I commenced stapling the cushion to the seat back starting at top and bottom center...using REMOVABLE STAPLES...you know, the hand operated stapler, and short staples. Pulling the cover tight, going around hardware and corners, getting the wrinkles out of the cover, and potentially having to reposition the entire pad, make it prudent for an amateur like me to be able to yank the staples out easily.
Eventually, once the cover was tight and smooth, I replaced the staples with tacks. My pneumatic stapler was too agressive, and there were many places on the seat where I couldn't get a stapler in anyway. Using individual tacks also allowed me to be quite a bit more precise in placing each fastener.
One thing I don't have a picture of was, this is the first time I marked a tack line AND a trimming line on the material, which really helped. I used a white "Stabilo" pencil to mark the lines. The mark wipes off the vinyl with a damp paper towel. The excess cover material was trimmed with a razor knife
At the bottom of the seat back cushion, however, I used a little different technique for fastening. There was still too much bulk at the bottom of the cushion for me to be able to really staple down tight, right up against the joint between the seat back and bottom. I also wanted to use a stiff strip of material as a "tacking strip" to reinforce the vinyl. The strip of material I used happened to be a piece of narrow BioThane . This material is so tough it could handle the pneumatic stapler. So I used the stapler itself to compress the cover and pad right to the joint, and stapled securely to the bottom seat board.
This was all pretty hard work. The above photo is the entirely finished seat, but at this point in the story, the next step was to trim all the excess material just inside the edge of the wood. A little extra cover material had been left along the bottom sides and tucked in neatly around the edges of the foam, no stapling necessary.
I am going to end here because I have to feed the horses, and it's a good place to stop. I will finish up doing the sides, applying edge welt and making a seat cushion in Part II.