I am going to brush paint this carriage. This is one of those decisions that may change. Although I have several good HVLP paint guns, my results with spray painting are "uniformly variable",as Mark Twain would say. This may be due in large part to my relative inexperience, but it could also be due to the fact that I am using fairly "old fashioned" paints that while they can be made to spray, are primarily designed for brushing.
My understanding is that paint formulations are changing almost daily as laws and regulations change. Some paints seem to want to come out of a paint gun like Silly String. I can never get a truly deep shine using the gun, except randomly. But if I do things really well, I can usually come up with a brilliant shine by brushing.
That doesn't mean I'm any better with a paint brush, but having learned a few things along the way, I think I may be a little more successful with a brush.
Two books that are of assistance in learning about brush painting are: The Restoration of Carriages by George Isles, Curator of the carriage collection from 1950 through 1980, The Museums at Stony Brook. Published by J.A. Allen, London, ISBN 0-85131-366-3. I think this book is out of print.
The other book is: Conservation and Restoration of Horse-Drawn Vehicles, by the Carriage Museum of America , ISBN 1-800499-05-3
Mr.Isles selects a camel hair brush for painting carriages. I once went to a craft store and bought an artist's camel hair brush. The brush turned out to be very poor quality and shed bristles badly.

Badger hair is somewhat stiff even in longer lengths. Most badger-hair brushes have a fan or round shape with a flat top for blending.
So these are the brushes I will be trialing for this blog entry.

As a further note, the more I read, the more references I see to "badger hair" brushes. For instance, the Conservation and Restoration book recommends the Corona 16055 brush. I'll have to try this one too.
This project is not related to the Concord wagon, but is a set of shafts for my last restoration. They are all new construction and have been acquired to allow me to drive a much larger horse to the vehicle than the original shafts.
I may as well paint them while I'm waiting for additional parts for the Concord's shafts.
PLEASE NOTE: These shafts have received HOURS of preliiminary surface preparation, at least 12 hours alone in sanding! The raw wood was first sanded, received a coat of sealer, sanded, a coat of "rough stuff", sanded, another coat of "rough stuff", and sanded assiduously until nearly down to bare wood all over, to provide the smoothest surface for applying primer and top coat. Needless to say, I want a paint brush that won't lay down a bunch of brush marks or bristles. Hopefully the remainder of the sanding will only be to prepare each coat for succeeding coats, and not to take out evidence of the previous application. If I've chosen good brushes (they got mixed, but mostly good, reviews), the rest of the painting job should go pleasantly.
Conservation and Restoration lists several reasons for pre-soaking the brushes in solvent before painting, so the brushes are hanging in solvent overnight for tomorrow's first assault on the shafts with primer.
Begins with cleaning the surface to be painted.

First I blow off the shafts with compressed air.
(Yes, I'm in a very poor environment for painting, unfortunately it can't be helped.)

Then I clean the surface with a degreaser, to remove any contaminants I may have transferred to the surface with my hands. You can use paint thinner or naptha or a solvent that is compatible with the paint you are about to apply.

Then I remove bits of dust and lint with a tack cloth.
A tack cloth is a piece of cheesecloth that has been treated with a non-drying varnish, which is slightly sticky, for picking contaminants off a surface which is about to be painted.

The tack cloth is unfolded completely and gently balled up, then lightly rubbed over the surface so as to pick up lint, but not leave sticky residue on the surface you are preparing.
The tack cloth will be good for many uses if you store it in a zip-lock bag.
Now I am ready to try out my new Redtree brand Americana Slim Badger Hair Brush.
But first, let's estabilish some realistic expectations for the brush.
I am about to apply a sandable primer to these shafts. I've already done a whole lot - hours - worth of preparation to the shafts and I haven't talked about that. I plan to as the restoration of the carriage proceeds. These shafts aren't part of the project but present a great opportunity to get some before-hand experience that will help me do a good job on the carriage...maybe you too. This post actually started out to be about the brush only, but then I realized there are too many variables to either blame or applaud the brush for, without a lot of explanation.
You need to use a sandable primer, one that dries hard enough to be sanded, because one of the primary objectives of priming is to achieve a mirror smooth surface to which you will apply your shiny top coats. You cannot achieve a really beautiful finish without extensive surface preparation.
The sandable primer needs to deliver a lot of solids to the surface, so imperfections can be filled. The solvent usually dries pretty quickly which doesn't leave a lot of time for the paint to "level" or blend itself into a smooth surface.
So I am going to forgive this brush if it leaves brush marks in the primer coats. I hope they'll be small though. Later, when applying the enamel, I expect the PAINT to behave much differently than the PRIMER, and a lot of the brush's performance will be due to my technique!
The main thing I want the brush to do now is not shed bristles!
TIP:
In order for brush strokes to blend smoothly, you must be able to maintain a "wet edge" on the brush. That is, you do not want the brush to start drying out and dragging across the surface, creating a real mess where your fresh stroke blends into previously applied paint. I think this is one place that has caused me the most grief with brush painting in the past. Every time my wet edge starts to dry out, I have always tried to re-wet it with paint. All this does is create heavy applications of paint that run or sag and STILL don't blend together with previously applied strokes.
When I first learned about -pre-loading the paint brush reservoir with solvent, an idea occurred to me, and it is one that I am still working on, but we all will know more about it by the end of this restoration project.
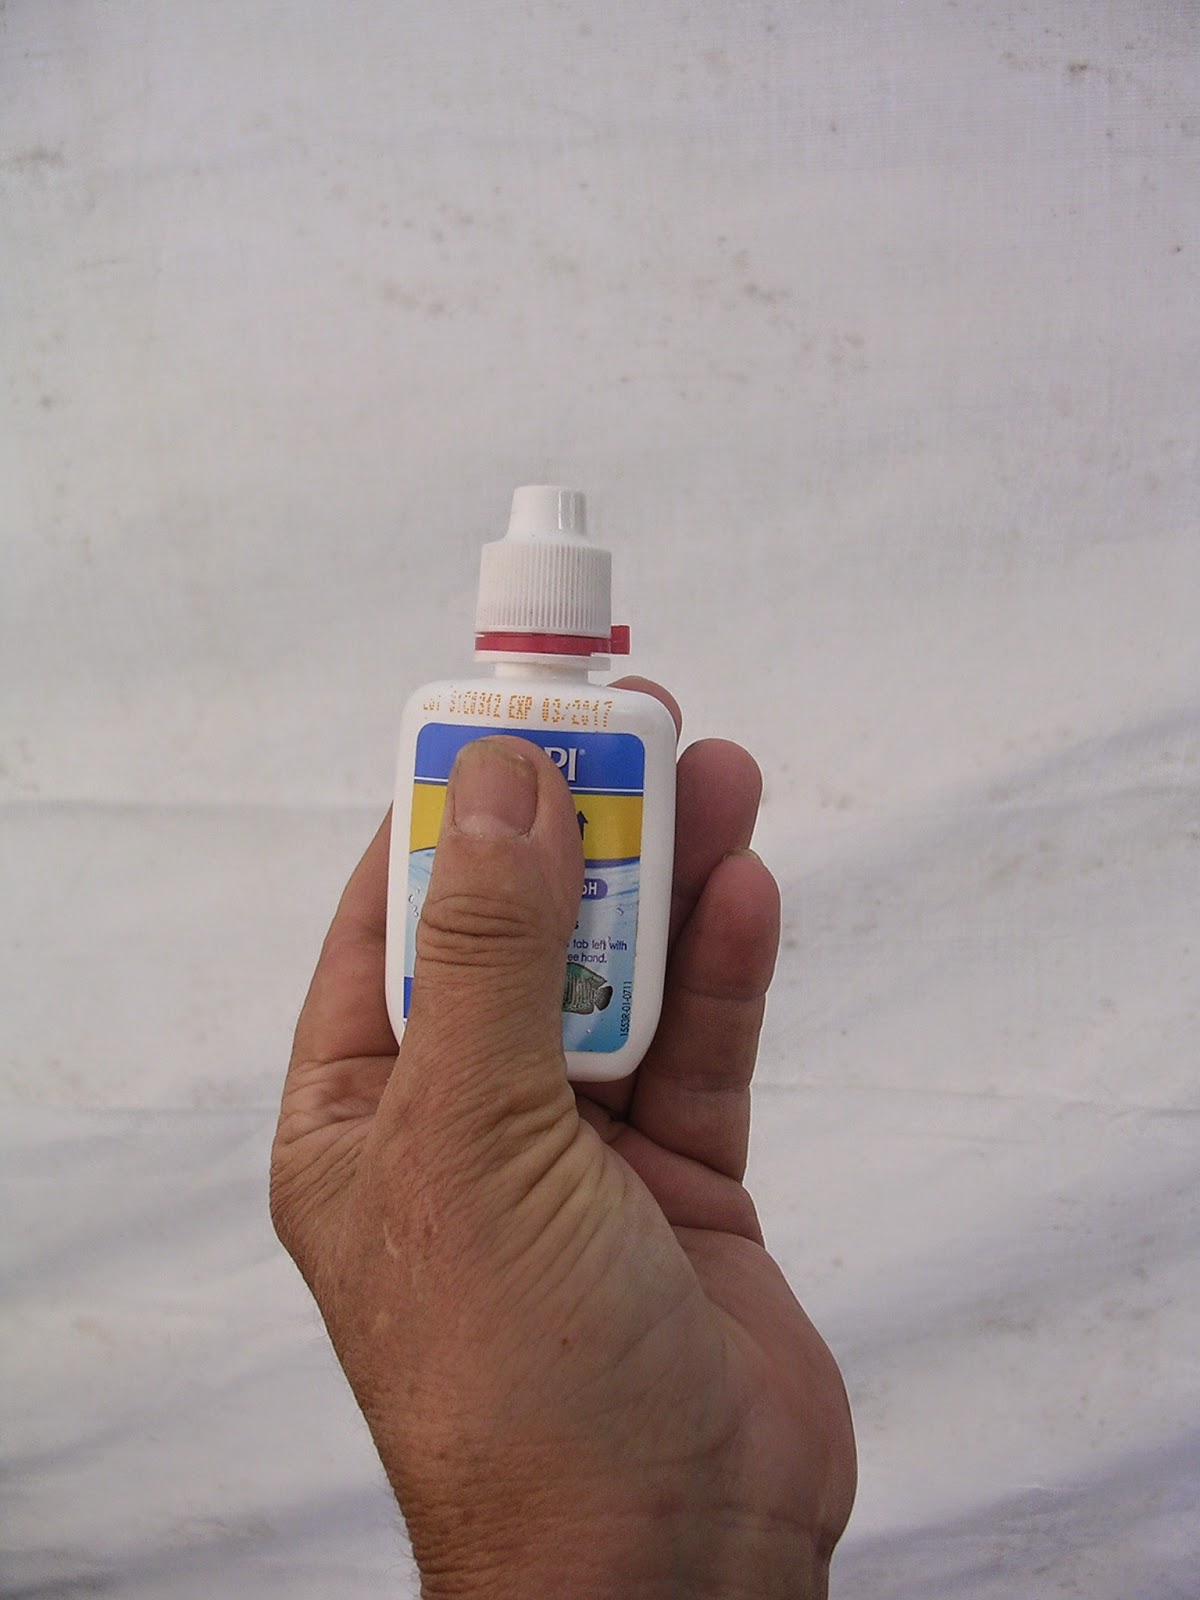
I took this small dropper-bottle and filled it with solvent. It originally contained a fish aquarium chemical that it doles out in controlled drops, like an eyedropper.
During the course of applying the first coat of primer to the wood, the brush maintained a wet edge throughought the entire first shaft, the cross bar and part way up the second shaft. Then the brush began to drag. I applied THREE DROPS of paint thinner to each side of the brush, just below the metal ferrule, a place where there should be no paint., The wet edge was instantly restored without making the paint run, and it remained wet for several minutes. Now that the original reservoir of solvent in the brush had been used up, I found the need for "re-charging" it came pretty frequently.
So, losing the wet edge on the brush is not a fault of the brush. And you can't expect to restore the wet edge by loading the brush with more paint. You need to experiment to see what works for you.

The first thing I learned was to shake out some of the solvent before dipping it in paint! Here are some wonderful notes I gleaned off a woodworking forum on the internet (when looking for more information on badger hair brushes):
"Dip the brush in the solvent for the finish and shake it out before dipping it in the actual finish. This slows down the curing of finish in the hilt of the brush.
"If the finish is a fast-dry evaporating one like laquer or shellac where the cured stuff will re-dissolve in the solvent, continue working on your project until done. If it's a polymerizing finish like polyurethane or latex paint, clean the brush every 15 minutes or so whether you're finished using it or not [this is where my dropper of solvent came in].
"Once you're done, clean the brush in a couple of washes of the solvent for the finish, shake it out and then - and this is important -, take it to the sink and cover it liberally with hand dishwashing detergent (with no water). Work this into the brush thoroughly, then wash it in clear warm water until the suds are gone.
"Finally, buy a brush comb (about $3 at Home Despot), comb it out, form it into a chisel shape, and let it air dry.
"Using techniques like this, you'll never have to treat a brush as a throw-away item ever again."
Thank you unknown contributor!
Anyway, pictured above, the shafts have received their first coat of sandable primer.
THE PAINT BRUSH DID NOT SHED A SINGLE BRISTLE.
TIP:
You will know your project is dry enough to recoat if it does not gum up the sandpaper when you are sanding in preparation for re-coating. If you have recommendations for drying times on your paint can, OBSERVE THEM or reap the consequences, seriously! Otherwise, pay attention to how the paint sands. This first coat was "dry as a bone" 24 hours after application. Some enamel top coats may take 2-4 days to dry sufficiently for re-coating, depending on atmospheric conditions. If you re-coat a piece that hasn't dried sufficiently to sand easily, expect a crappy re-coat and don't blame the brush!
Next Morning...

A very light going-over with 220 grit dry sandpaper shows,
Oh, yeah, we got brush marks!
But they're pretty fine,despite how awful this picture makes things look!
There are a couple of different ways I can proceed here...one is to sand these brush marks out all the way, which is pretty radical, but some people do it that way. Feel free, if you love to sand!
The other way is to sand lightly, and apply another coat, aiming to sand out ALL imperfections on the final wet-sanding..
Once again, the object of priming is not to lay up huge quantities of material, but to fill in all the imperfections in the wood to the point where you can sand to a mirror smooth finish without cutting through to the bare wood. Thick layers of paint like to crack. But during the lightest dusting with 220 grit dry sandpaper, it was clear that any serious sanding would cut right through to bare wood. So we go to the second coat.
I am telling you all this because the brush (perhaps more correctly, the primer) handled differently on the previously primed surface.
The primer just GLOMMED onto the previous coat and the brush lost its wet edge much more quickly. There were also many fewer drips, with perhaps a slightly heavier application.
In fact, the brush laid down a very nice coat of primer on the second try. It seemed to level better,but the wet edge evaporated rapidly and frequently! So the little dropper bottle was kept busy!
Even though brush marks remain, the surface of the shafts is acquiring a sort of "creamy" look to it...the raw look is going away.
And the brush did not shed a single bristle.
BRUSH CARE BETWEEN COATS
I have discovered that keeping a reservoir of solvent in the brush just below the ferrule REALLY makes cleanup easier!
What I've been doing to clean the brush is trickle clean solvent over the bristles until the pigment stops coming out. When the brush is clean, and I intend to use it again soon, I SUSPEND it in a can of clean solvent, neither touching the sides nor the bottom of the can.
TIP:
Did you know that you can reclaim the solvent you use for cleaning your brush! You simply set the dirty solvent aside and allow the pigments to settle to the bottom. Then you can pour off the clean solvent and use it again and again for cleaning your brushes. Saves money and helps the environment!
 My husband gave me this big old metal funnel for cleaning my brushes. I hold the brush over the funnel while pouring a trickle of clean thinner through the bristles. I have one jug for dirty thinner and one for clean, reclaimed thinner. The wide funnel is like cleaning the brush over a sink!

When the solids have settled out of the dirty solvent, I pour off the clean solvent into another jug, straining it through a paint strainer. I'm planning on trying a coffee filter to see if I can strain out finer particles.
PAUSE FOR A LITTLE COMFORTING INFORMATION
I've drug out another source of information on brush painting, "A Coachpainting Guide" by John H. Ousbey, F.R.S.A. In this booklet, Mr. Ousbey attempts to help us understand the process of coachpainting using modern materials.
This is a tiny little volume that I am sure I obtained from the Carriage Association of America decades ago, but which I see is sadly no longer available from that source. It is "An Ousbey Carriages booklet" published by Ousbey Carriages, Ormond Lodge, Newbold-on-Stour, Stratford-on-Avon, Warwickshire...we presume that is in England, although it doesn't say. Copyright 1988.
I'll be quite frank. At the time I bought the book I could not appreciate it because "a lot was lost in the translation." The materials accessible to me (especially at that pre-internet time) did not go by his terms for materials at all. For instance, his "primer" is my "clear wood sealer" and his "filler" is my "sandable primer".
Happily, I just found Mr.Ousbey here .
The comforting passage from the booklet, for the sake of our paint brush, is this:
"Because of the nature of this filler paint (which is basically what we are applying to the shafts at this point) when brushed it is not possible to avoid brushmarks, these are lines in the surface caused by the brush bristles. However it is possible to minimise them by 'laying-off' each coat in a different direction so that a cross hatching effect results. This in a six-coat system three coats will be vertically laid off and three horizontally laid off, alternatively of course."
So any expectation of our brush producing a flat, smooth surface at this point can be summarily rejected. We are right on track. (And we can be secretly relieved knowing that there is no Deep Dark Coachpainter's Secret that would have prevented brush marks at this stage!)
And with that I'll move along, since painting the top coat is a whole 'nother story. I'm happy with the Redtree Badger Hair brush, and using it to apply the primer coats has been a good way to break it in. We'll see how it does on enamel a few from now!
Thank you unknown contributor!
Anyway, pictured above, the shafts have received their first coat of sandable primer.
THE PAINT BRUSH DID NOT SHED A SINGLE BRISTLE.
TIP:
You will know your project is dry enough to recoat if it does not gum up the sandpaper when you are sanding in preparation for re-coating. If you have recommendations for drying times on your paint can, OBSERVE THEM or reap the consequences, seriously! Otherwise, pay attention to how the paint sands. This first coat was "dry as a bone" 24 hours after application. Some enamel top coats may take 2-4 days to dry sufficiently for re-coating, depending on atmospheric conditions. If you re-coat a piece that hasn't dried sufficiently to sand easily, expect a crappy re-coat and don't blame the brush!
Next Morning...
A very light going-over with 220 grit dry sandpaper shows,
Oh, yeah, we got brush marks!
But they're pretty fine,despite how awful this picture makes things look!
There are a couple of different ways I can proceed here...one is to sand these brush marks out all the way, which is pretty radical, but some people do it that way. Feel free, if you love to sand!
The other way is to sand lightly, and apply another coat, aiming to sand out ALL imperfections on the final wet-sanding..
Once again, the object of priming is not to lay up huge quantities of material, but to fill in all the imperfections in the wood to the point where you can sand to a mirror smooth finish without cutting through to the bare wood. Thick layers of paint like to crack. But during the lightest dusting with 220 grit dry sandpaper, it was clear that any serious sanding would cut right through to bare wood. So we go to the second coat.
I am telling you all this because the brush (perhaps more correctly, the primer) handled differently on the previously primed surface.
The primer just GLOMMED onto the previous coat and the brush lost its wet edge much more quickly. There were also many fewer drips, with perhaps a slightly heavier application.
In fact, the brush laid down a very nice coat of primer on the second try. It seemed to level better,but the wet edge evaporated rapidly and frequently! So the little dropper bottle was kept busy!
Even though brush marks remain, the surface of the shafts is acquiring a sort of "creamy" look to it...the raw look is going away.
And the brush did not shed a single bristle.
BRUSH CARE BETWEEN COATS
I have discovered that keeping a reservoir of solvent in the brush just below the ferrule REALLY makes cleanup easier!
What I've been doing to clean the brush is trickle clean solvent over the bristles until the pigment stops coming out. When the brush is clean, and I intend to use it again soon, I SUSPEND it in a can of clean solvent, neither touching the sides nor the bottom of the can.
TIP:
Did you know that you can reclaim the solvent you use for cleaning your brush! You simply set the dirty solvent aside and allow the pigments to settle to the bottom. Then you can pour off the clean solvent and use it again and again for cleaning your brushes. Saves money and helps the environment!
When the solids have settled out of the dirty solvent, I pour off the clean solvent into another jug, straining it through a paint strainer. I'm planning on trying a coffee filter to see if I can strain out finer particles.
PAUSE FOR A LITTLE COMFORTING INFORMATION
I've drug out another source of information on brush painting, "A Coachpainting Guide" by John H. Ousbey, F.R.S.A. In this booklet, Mr. Ousbey attempts to help us understand the process of coachpainting using modern materials.
This is a tiny little volume that I am sure I obtained from the Carriage Association of America decades ago, but which I see is sadly no longer available from that source. It is "An Ousbey Carriages booklet" published by Ousbey Carriages, Ormond Lodge, Newbold-on-Stour, Stratford-on-Avon, Warwickshire...we presume that is in England, although it doesn't say. Copyright 1988.
I'll be quite frank. At the time I bought the book I could not appreciate it because "a lot was lost in the translation." The materials accessible to me (especially at that pre-internet time) did not go by his terms for materials at all. For instance, his "primer" is my "clear wood sealer" and his "filler" is my "sandable primer".
Happily, I just found Mr.Ousbey here .
The comforting passage from the booklet, for the sake of our paint brush, is this:
"Because of the nature of this filler paint (which is basically what we are applying to the shafts at this point) when brushed it is not possible to avoid brushmarks, these are lines in the surface caused by the brush bristles. However it is possible to minimise them by 'laying-off' each coat in a different direction so that a cross hatching effect results. This in a six-coat system three coats will be vertically laid off and three horizontally laid off, alternatively of course."
So any expectation of our brush producing a flat, smooth surface at this point can be summarily rejected. We are right on track. (And we can be secretly relieved knowing that there is no Deep Dark Coachpainter's Secret that would have prevented brush marks at this stage!)
And with that I'll move along, since painting the top coat is a whole 'nother story. I'm happy with the Redtree Badger Hair brush, and using it to apply the primer coats has been a good way to break it in. We'll see how it does on enamel a few from now!
No comments:
Post a Comment